I have been using PocketWizard Control-TL triggers (MiniTT1/FlexTT5/PowerMC2) for quite some, so invariably someone will ask me questions about how to use them.
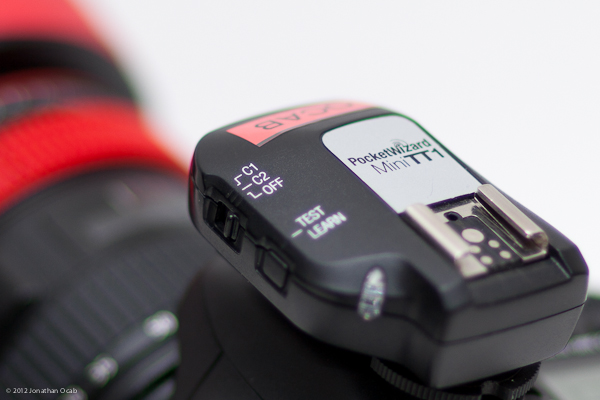
I was in Beverly Hills last month attending a group shoot event and was approached by a couple photographers who just recently acquired the TT1/TT5 system and had questions about them, particularly about basic usage and setup. I also get contacted occasionally via email, youtube, twitter, etc., by other photographers who have questions about the TT1/TT5 units. It seems like many of the questions stem from simple confusion on how the units actually work compared to the PocketWizard Plus II and PocketWizard MultiMAX units.
With that, I felt a quick and dirty primer on what you should do when you get your PocketWizard TT1 and TT5 system was worth posting.
While you *can* open up a brand new MiniTT1 and FlexTT5, go straight from the box, attach them to your camera and start shooting, you really shouldn’t. The factory defaults will technically work, but you should customize the configuration. At the very least change the channels assigned to your TT1 and TT5 units.
First off, you need to install the PocketWizard Utility onto your Windows or Mac computer. It’s a free download from the PocketWizard website (see: Support -> Downloads).
Launch the PocketWizard Utility and plug MiniTT1 into your computer via USB cable.
When you plug it in, it will appear in the PW Utility shortly and you will see the adjustment tabs available. Note: Check the “Advanced Mode” checkbox at the bottom of the utility window to see all options.
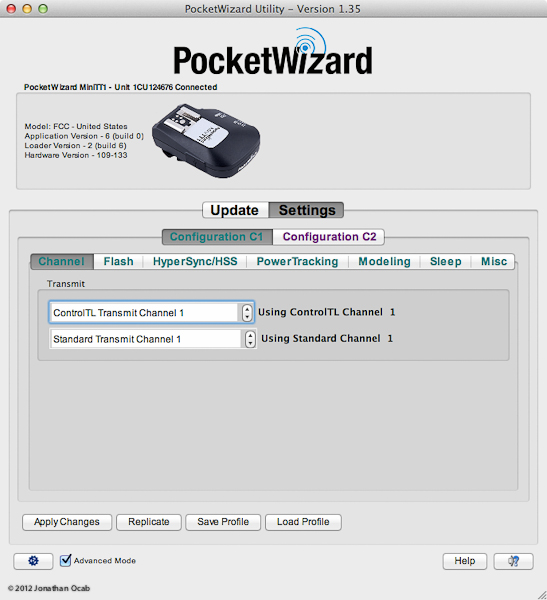
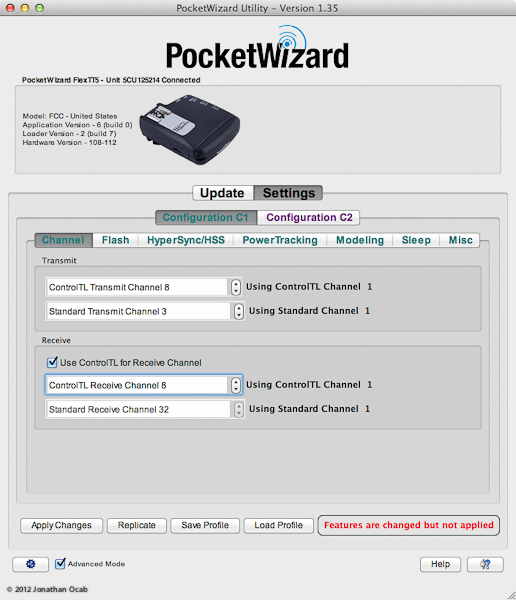
The Configuration C1 tab will open up initially and on the Channel sub-tab. It is important to note that C1 and C2 does not mean “Channel 1” and “Channel 2”. People look at the MiniTT1 and FlexTT5 units and think they refer to what channel they are on. C1 and C2 simply mean “Configuration 1” and “Configuration 2”, respectively.
You will notice in the above screenshot that there are two Transmit channels. This means that the MiniTT1 will transmit on one Control-TL channel and one Standard channel at the same time, every time the TT1 is triggered.
Taking a step back, there is a difference between a Standard channel and a Control-TL channel. The Standard channel is the most basic triggering communication. If you just want to sync a remote flash to your camera’s shutter, Standard channel communication is all you need. But, if you want to do anything more advanced, such as remotely controlling the output power of your strobe or using the High Speed Sync (HSS) of the flash remotely, then you have to use Control-TL channel communications.
That said, the fact that the TT1 transmits both a Control-TL and Standard TL signal each time it is triggered is an important characteristic to note. For example, perhaps you use a mix of strobes/flashes and PocketWizards. Let’s say you had a Canon 580 EX II that you wanted to control the power output of, but you also had a basic studio strobe. You could setup FlexTT5 on the 580 EX II receiving on Control-TL channel 14 and a PocketWizard Plus II on the basic studio strobe receiving on Standard channel 4 and trigger both simultaneously from your TT1.
This feature does give you a some extra flexibility in a lighting setup.
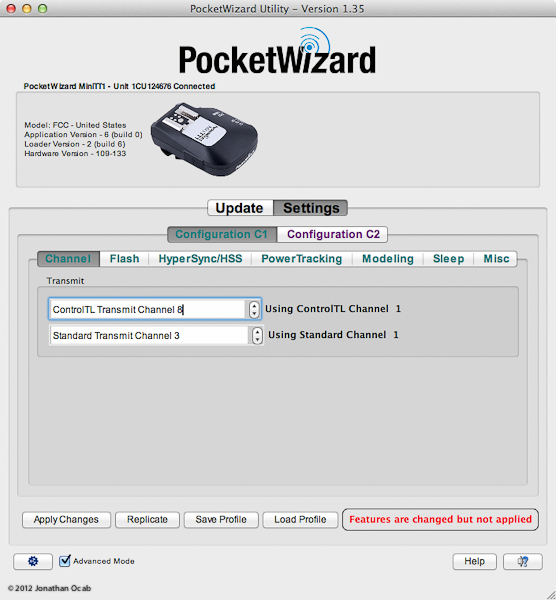
Going back to setting up the TT1’s channel, you should go ahead and select channels other than the factory default. What you want to set then to is up to you. I personally set the Control-TL channels different on the C1 and C2 settings, so in the event I’m in an environment or at a location where someone else may be using PocketWizards, I have the option of immediately switching to another channel if there is a channel conflict with another person. As far as the Standard channel, I don’t use Standard channel communications in my normal lighting setup. But for the sake of setting them, I typically set them on the same numeric channel as my Control-TL channel (e.g. Control-TL channel 7 and Standard channel 7).
If you were so inclined, you could set your Standard channels for C1 and C2 to something between 1 and 4. Why? Well, PocketWizard Plus II are still the most commonly used PW units and they can only send/receive on Standard channels 1 through 4. If you collaborated with other photographers who use Plus II units, then setting your C1 and C2 to transmit on Standard 1 and Standard 2, respectively (or Standard 3 and Standard 4), would give you the ability to hop on their lights with your TT1. I used to setup my TT1’s Standard channel settings in this manner, but I eventually use picked up a single PW Plus II unit for times I’m working with friends who also use Plus II units.
In the above screenshot, I went ahead and set my C1 configuration to transmit Control-TL channel 8 and Standard channel 3. This means that any PocketWizards receiving on Control-TL 8 or Standard 3 will be triggered by the TT1.
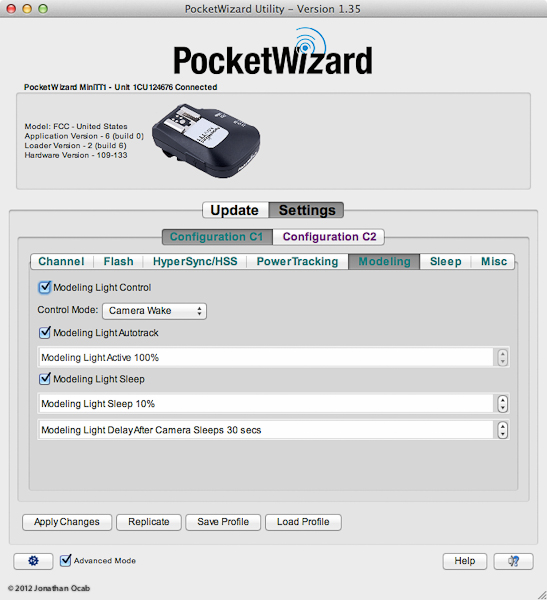
After setting up the default Transmit channels for C1 (and C2), the only other item in the factory default settings that I will adjust is the Modeling Light Control option under the Modeling sub-tab.
In the above screenshot, you will see the “Modeling Light Control” checkbox. I uncheck that box to turn it OFF.
The reason why is because this option can result in the modeling lamp turning on even though you specifically turned it off on the strobe itself. I speak specifically in terms of the Paul C. Buff Einstein 640 studio strobe.
I often use my Paul C. Buff Einstein or Alien Bees strobes on battery power (Vagabond Mini Lithium) and have to turn off the modeling lamp otherwise I will kill the battery. While the Alien Bees has an analog button to toggle the modeling lamp on and off, the Einstein is toggled on/off and controlled on the strobe using a digital LCD screen on the strobe itself.
When I’m working off the battery, I will run through the Einstein’s LCD panel and turn off the modeling lamp. Let’s say I’m shooting a set of shots and then take a short break for the model to change outfits and so I can adjust the position of the lights. The Einstein will go into a ‘sleep’ mode of sort during this time. When I start shooting again, the PocketWizards will activate the Einstein when I half-press the shutter botton and it sends that initial signal to the strobe (from TT1 to the TT5 or PowerMC2).
If the “Modeling Light Control” were enabled on the PocketWizard units, the modeling lamp will turn on, even though I had manually turned it off by accessing the LCD panel directly on the Einstein. This can be bad because more often than not, I won’t realize the lamp turned on since I’m most likely outdoors (which is why I’m using the battery in the first place) and and it is daylight, until it’s too late (the battery dies).
This is why I go ahead and just turn the “Modeling Light Control” option off on the PocketWizard units. I have no problem manually configuring the behavior of the modeling lamp directly on the strobe since how I want the modeling lamp to behave will vary depending on the conditions of the specific shoot.
That said, that’s pretty much all I configure on the TT1. If you look back at it, it’s actually not much; just setting the channels and turning off the “Modeling Lamp Control” for C1 and C2 and saving the settings. Everything else I simply leave on factory default mode.
As far as the TT5, it’s pretty much the same settings. Plug the FlexTT5 into your computer via a USB cable and it will load in the PW Utility as shown.
If you look carefully at the above screen shot with the, the Channel sub-tab has both Transmit and Receive channel settings. This is because a FlexTT5 is a transceiver. It can function as either a transmitter (on the camera) or a receiver (connected to the strobe).
I setup my FlexTT5 units’ C1 and C2 Transmit channel settings to the same as my MiniTT1. This is so if I were in a situation where I wanted to let someone else hop onto my lighting setup or if I were using a second camera body and using both my primary and secondary during the shoot, I can simply use the FlexTT5 on the hot shoe of the other camera and be good to go.
As far as the Receive channel settings, you will notice in the above screen shot that there is a checkbox for “Use ControlTL for Receive Channel”. This toggles the FlexTT5 to either receive on Control-TL or Standard. The FlexTT5 *cannot* receive on both a Control-TL and Standard channel at the same time. I have no idea why. You would think it would since both a TT1 and TT5 can transmit on both a Control-TL and Standard channel simultaneously.
Since I use Control-TL, I have that option turned on (box checked).
After I setup the Channels for C1 and C2, I turn off the Modeling Lamp Control options on both C1 and C2 of the FlexTT5 and save the settings.
That’s all I touch on the PocketWizard TT1/TT5 units as far as the PW Utility is concerned. I have not spent any time messing around with HyperSync or HSS with the PW units, so I can’t give any advice on the items in those tabs.
So if you just acquired the PocketWizard MiniTT1/FlexTT5 system (including the AC3, AC9, and PowerMC2), this should give you some insight on the basic configuration of the triggers.
I also recorded a narrated computer screen capture video walking through the PW Utility and posted it on Youtube:

Dave Buck
Thanks for this Jonathan, your explanations straightened me around on a couple of things. I already have the MiniTT1 and the FlexTT5, and the manuals are never enough to sort everything out. I have been looking for differences between the MiniTT1 (Nikon), versus Plus II’s (and now the Plus III), wondering if I should have purchased the PlusII, but I think I made the right choice.
Dave
Patrick Fallon
Hi Jonathon, great article, thanks for posting it. A question for you (if you have time to answer it). I am shooting on Nikon with multiple Flexes and a MiniTT1. Pocket Wizard Utility (the latest version, version 1.55) won’t let me select higher than channel 3 for either receive or transmit on the ControlTL channels. However the PW Wiki Manual says there are 20 ControlTL channels to choose from and I see from your screen grabs above that you can select at least as high as ControlTL channel 8. Are you on Canon and the PW utility is different for Canon? Or is there something simple I’m missing here? All the PW photogs I know are on ControlTL channels 1-3 and the channel overlap is killing me. Pocket Wizard have not replied to my inquiries on this front, hoping you can help. Cheers, Patrick.
ocabj
@Patrick: I don’t know why you wouldn’t be able to select a ControlTL channel beyond 3. What I would do is do a factory reset of your TT1 / TT5 units. If you can’t select another channel beyond 3 after the factory reset, make sure your units’ firmware is up to date.