New shooters getting into the sport of competitive High Power with a Service Rifle have probably been told to mark their sights. But what does this mean and why should you do it?
Marking the rear sight is simply the act placing index marks on a rear sight to show the mechanical zero (elevation and windage) and/or the operator’s zeros.
When marking for windage, pretty much most competitors mark their rear sight in order to make resetting to mechanical windage zero faster and more definite.
Initially, rookie competitors will question why this is necessary since the rear sight housing already has index marks for windage. But, if you ever look at the standard index marks on the rear sight housing, the lines are very fine/thin.
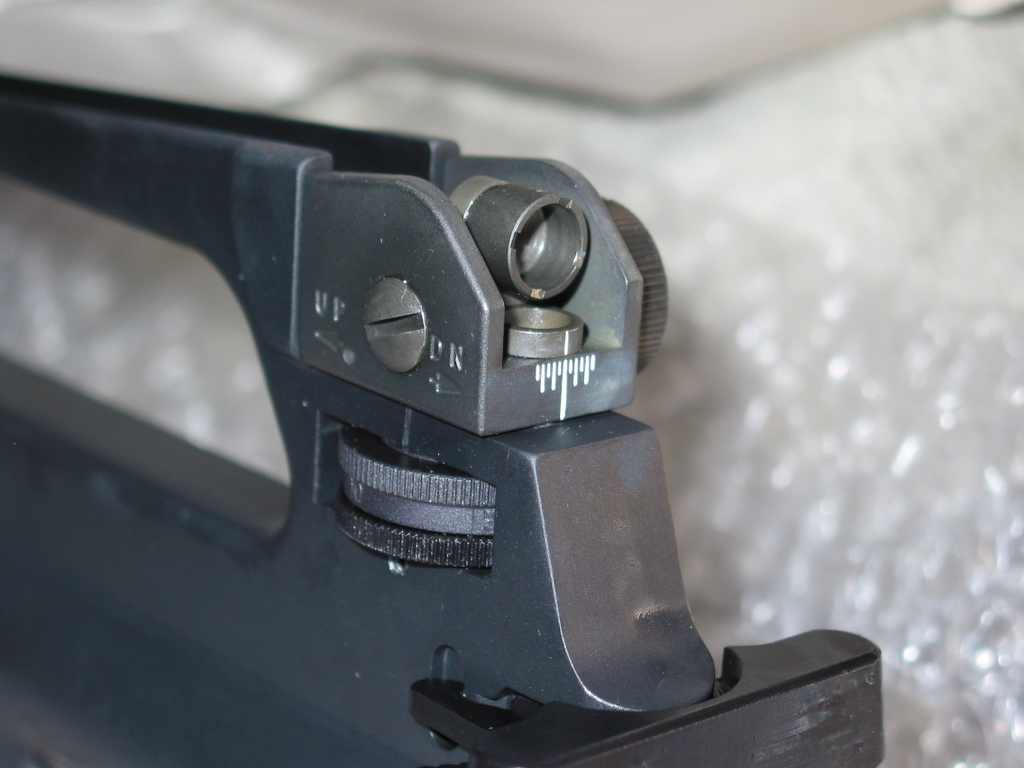
If for some reason you go over 13 clicks left from mechanical zero and don’t remember how many clicks you came over, can you recenter the rear sight using the index marks? There’s a good chance you can, but there’s also the chance you’ll be off by one or two clicks either way from center.
I’ve had this happen to me occasionally, specifically after finishing up on the 600 yard line during a variable wind string of fire. Sometimes I’ll make minor adjustments during a 22-round 600 yard prone string and forget to write down after a shot if I made an adjustment.
For example, I may finish firing the last round of a 22-round string thinking I had 15 clicks left windage when I actually had 17 clicks of left windage on the gun. I’ll come back 15 clicks right and look at the rear sight and it appears centered based on the index marks, when in actuality it’s still 2 clicks left of center.
You can easily remedy this issue by marking the windage knob itself. I’m a minimalist so I only run a single mark, but it’s effective. With the rear sight at what I am fairly confident is the mechanical zero (and very close, if not the same as the no-wind zero), I take a silver paint pen and make a line across the side of the elevation knob and the rear sight housing.
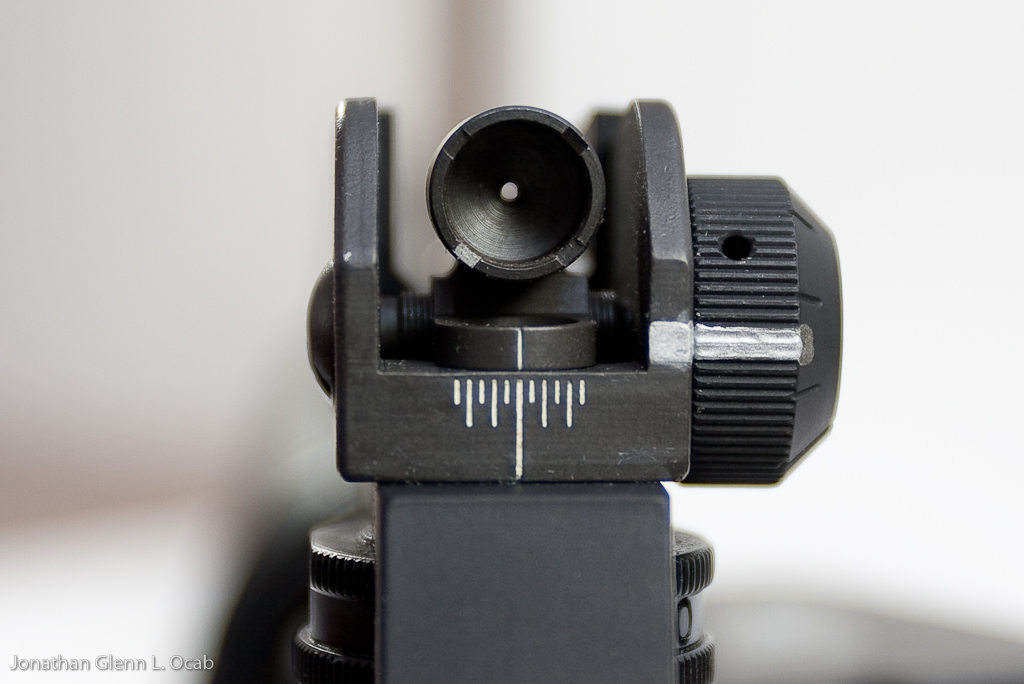
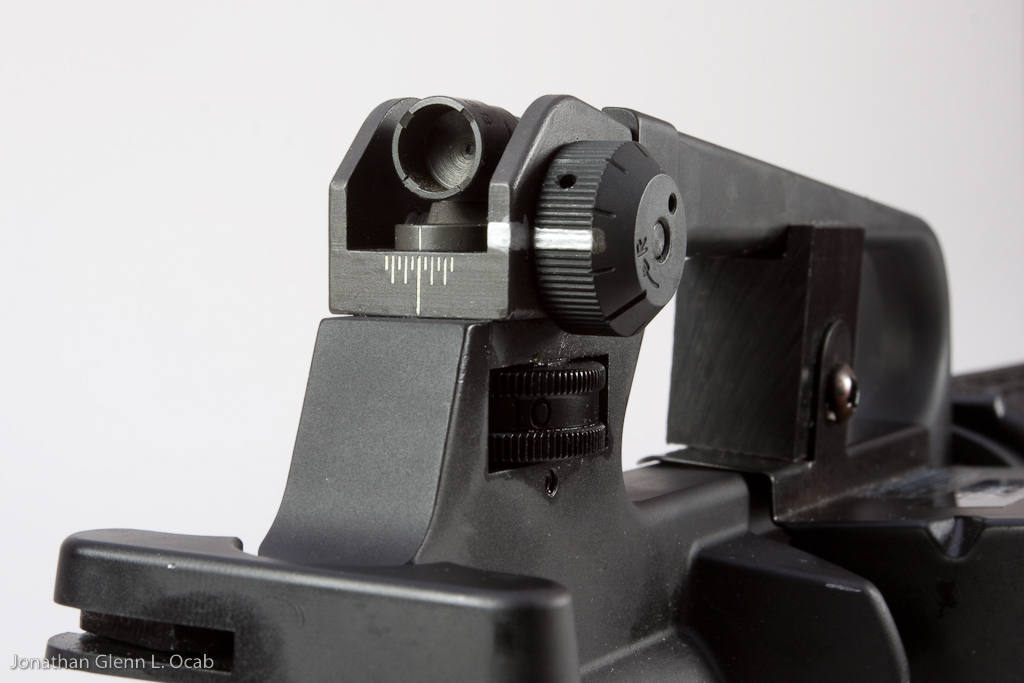
The above photos show how I can see the marks either from the side or while behind the gun. Used in conjunction with the index marks already on the rear sight, I can easily reset and verify that the rear sight is at what I believe is mechanical zero.
Even if the rear sight is one click off windage-wise, I will know because the mark on the knob won’t match mark on side of rear sight housing. The following image from top to bottom shows the rear sight when it is one click right of center, at mechanical zero, and one click left of center. Note how even though the windage index marks on the rear of the housing appear centered in all three cases, it’s not easy to tell, whereas with the added paint mark it is very obvious.
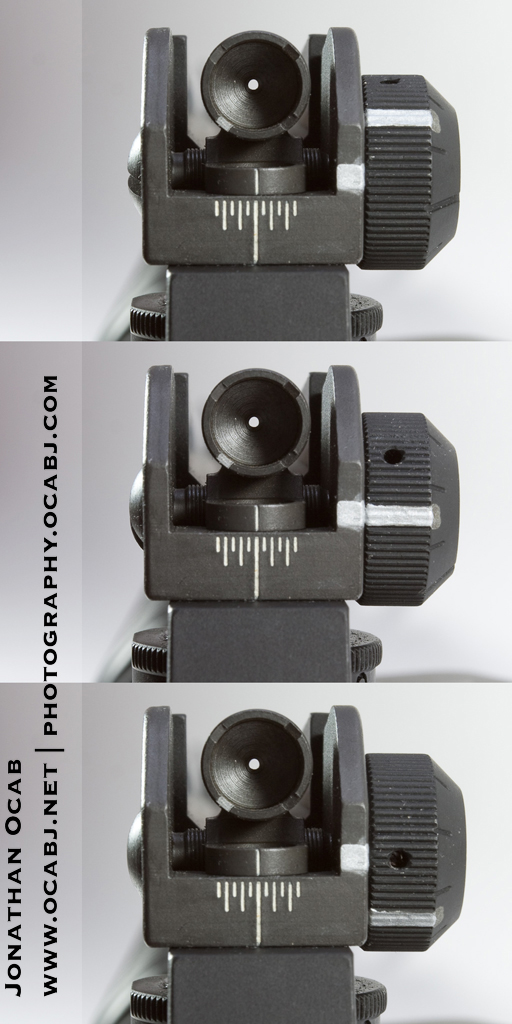
Note that some people like to make additional marks on the rear of the rear sight housing to help index windage, but I find that the existing windage index marks in conjunction with the single mark added on the knob itself work fine for me.
For marking elevation, some people like to mark their rear sight so each elevation zero for 200, 300, and 600 yards are indexed for quick adjustment. I’m not a fan of this because elevation zeros do change based on location (specifically altitude above sea level) and age of the barrel (diminishing muzzle velocity as throat wears).
I personally prefer to write down my elevation zeros for specific ranges in a data book or notebook based on clicks from bottom. For example, if my 300 yard elevation zero for Wilcox Range 103 at Marine Corps Base Camp Pendleton is 24 clicks from bottom with center hold, I will write that down. The next time I shoot a match at that range and I get to the 300 yard line for rapid prone, I’ll click down to bottom and click back up 24 clicks. Then when I shoot my two sighters, I’ll adjust my elevation as required depending on conditions (i.e. sunlight, clouds, haze). If for some reason I shoot rapid fire string at 300 using an elevation not 24 clicks from bottom, I’ll make note of that in my book for later reference.
So how do I mark for elevation? Again, the mark I make is very minimal and amounts to a single mark across the side of the rear sight housing and carry handle while the rear sight is bottomed out (zero clicks from bottom).
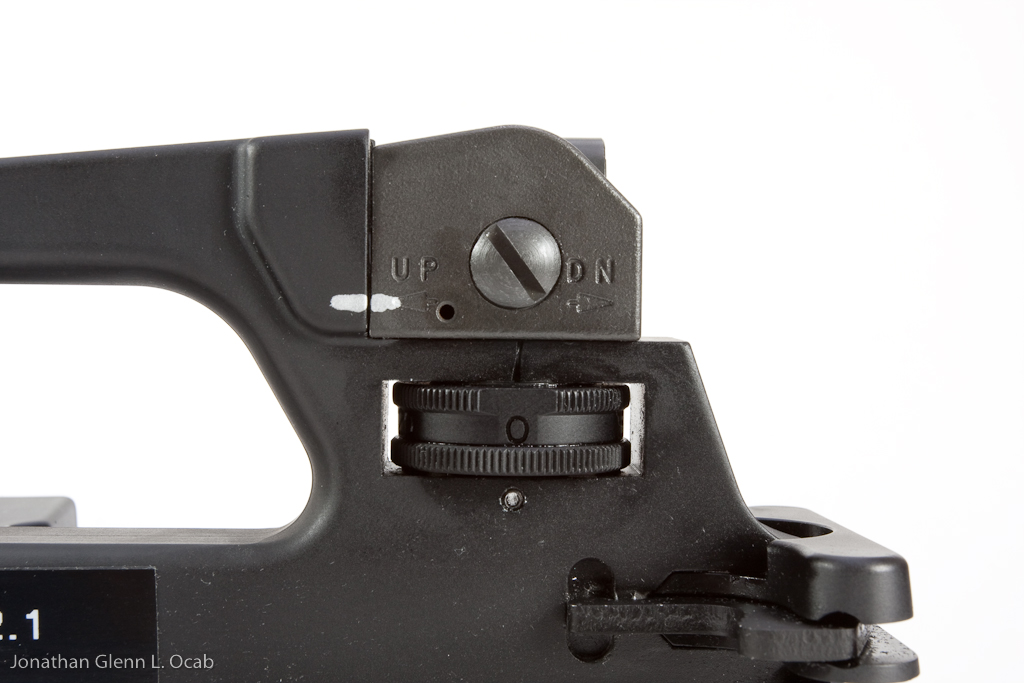
The cool thing with my guns is that I use White Oak Armament uppers, and White Oak uses elevation wheels with number scales on them. The wheel is stamped every five clicks with 25 clicks for a full revolution, resulting in scale markings of 0, 5, 10, 15, and 20.
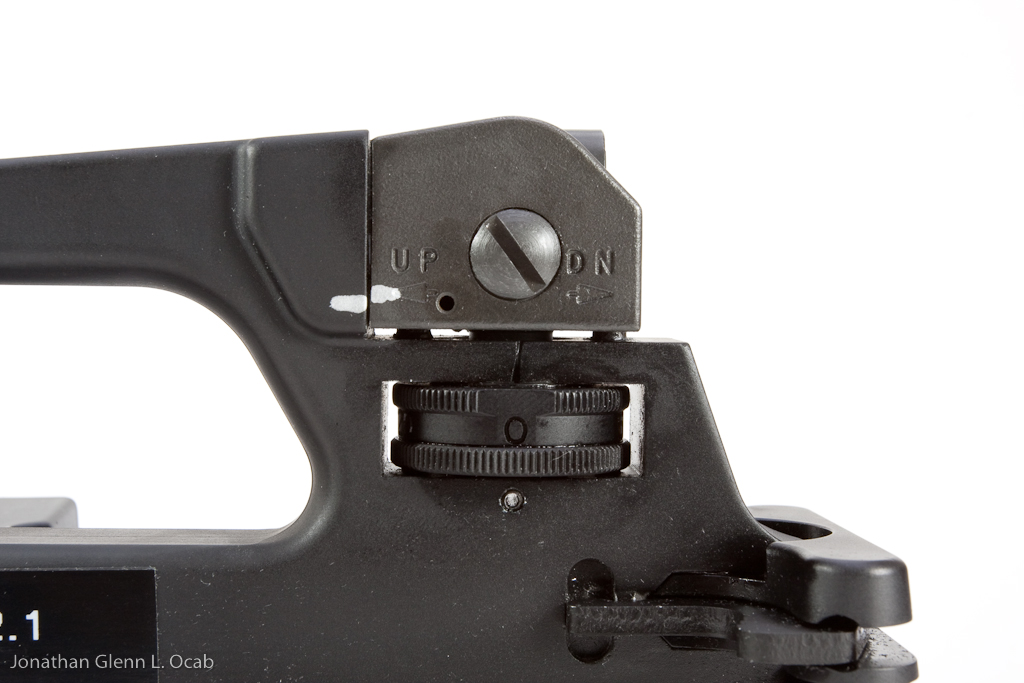
The above photo shows how the rear sight appears when the elevation wheel is run up one full revolution (25 clicks) and back at zero on the wheel. It is very obvious that the elevation wheel is not bottomed out even though the scale shows zero. Thus, the marking I made on my own sight is not as useful. But for the sake of having an added visual indicator to glance at quickly, it works.
On the other hand, there are some people who use rear sights that don’t have an elevation wheel with scale marks, but use the traditional “8/3” elevation wheel or an unmarked elevation wheel. In that case, it’s highly recommended to make index marks on the wheel itself (see the United States Army Marksmanship Unit article “No-Wind Zero and Marking Your Sights” on the CMP Competitions website).
Reflecting back on my own equipment, it might actually be more useful for me to make an additional mark for elevation when the wheel is turned two full revolutions. For me, this would make it a lot easier/faster to figure out when I’m at 50 clicks from bottom (vs 25 clicks or 75 clicks from bottom) without having to click all the way down to zero clicks and clicking back up.
50 clicks from bottom is a useful index mark to make since depending on the upper I’m using, my 600 yard elevation zero will be somewhere between 50 and 75 clicks from bottom. Thus, I am often turning the wheel two full revolutions during a full course High Power match.
One additional index mark that I’ve found useful to make is on the hooded aperture.
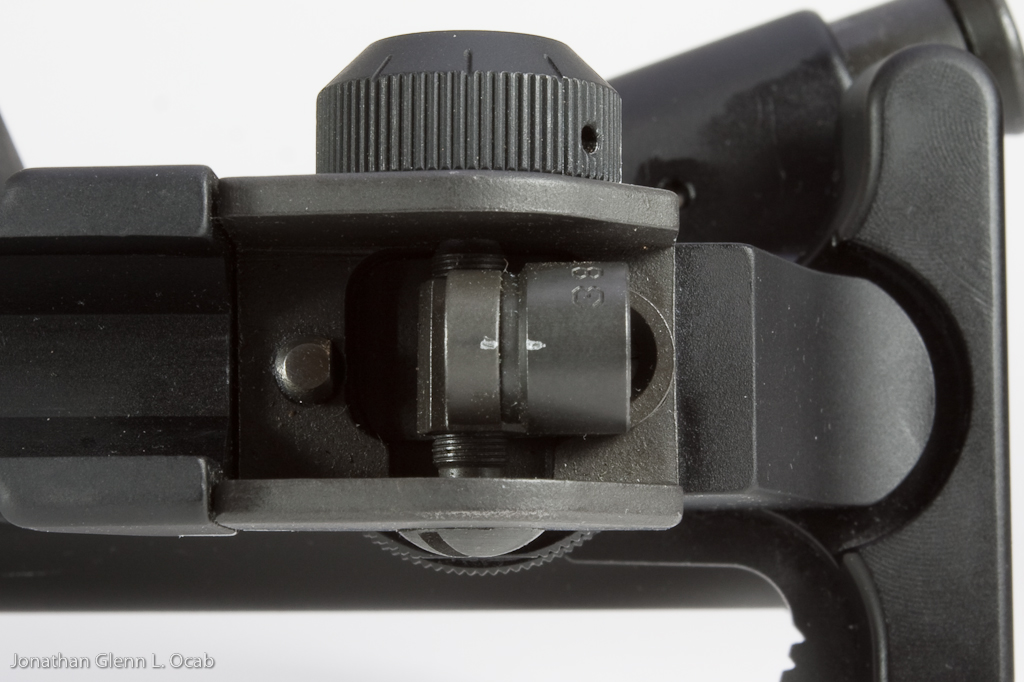
The reason why I made a very small index mark on the top center of the rear sight hood and the rear sight leaf is because my White Oak Armament rear sight leaf is threaded for removable apertures. While I never change the aperture (I personally use a .038″), I’ve had the rear aperture come loose during a match and I didn’t know.
At one match, I started shooting my 600 yard slow fire prone string and the first few shots were 10’s, but then suddenly, I couldn’t keep them in the center and had hits all outside of my call and going out as far as the 7-ring.
When the match was over and I got my gear in the truck, I looked at my rear sight to reset the windage and elevation knobs to zero, I noticed the rear sight aperture/hood was freely turning and realized my rear sight aperture was loose and moving after every shot (due to recoil). After that day, I got into the habit of checking the rear aperture before and after every stage of fire.
Hopefully this has provided insight for novice High Power Rifle competitors and can serve as a reference for anyone who plans on getting into competitive High Power shooting in the future.
Postscript:
For interested parties, I walk through my sights with my current competition upper in the following manner.
- Before the match begins, the rifle is 0 clicks from bottom and at mechanical windage zero. My rifle’s no-wind zero is actually 2 clicks (.5 MOA) left of mechanical zero.
- For 200 yard standing slow fire stage, I need 2 clicks right of no-wind zero for windage and 18 clicks from bottom for elevation. Since mechanical zero is already 2 clicks right of no-wind, I leave windage at mechanical zero. Dial elevation wheel 18 clicks from bottom. Windage/elevation may change during actual 200 yard standing live fire depending on conditions.
- After the last round of 200 yard standing is fired, record any elevation/windage adjustments made and configure sights for 200 yard sitting (with no-wind). I need 16 clicks from bottom for elevation in sitting. Dial elevation wheel 16 clicks from bottom and dial windage knob 2 clicks left from mechanical zero. Windage/elevation may change during actual 200 yard sitting live fire depending on conditions
- After the last round of 200 yard sitting is fired, record any elevation/windage adjustments made and configure sights for 300 yard prone (with no-wind). I need 25 clicks from bottom for 300 yard prone. Dial elevation wheel 25 clicks from bottom and dial windage knob 2 clicks left from mechanical zero. Windage/elevation may change during actual 300 yard prone live fire depending on conditions.
- After the last round of 300 yard prone is fired, record any elevation/windage adjustments made and configure sights for 600 yard prone (with no-wind). I need about 75 clicks from bottom for 600 yard prone (give or take a half minute). Dial elevation wheel 75 clicks from bottom and dial windage knob 2 clicks left from mechanical zero. Windage/elevation may change during actual 600 yard prone live fire depending on conditions.
- After the last round of 600 yard prone is fired, record any record any elevation/windage adjustments made and configure sights back to zero. Dial elevation wheel to bottom (0 clicks from bottom) and dial windage knob to mechanical zero. Sights are now ready for the next match.

Lew
You missed the obvious. What did you mark your sigth with? I tried white grease pencil but it doesn’t stay. What do I use that doesn’t make a mess? Can you include comments on how your marked your sights.
ocabj
Silver paint pen. Some people use finger nail polish.
Shawn
Why do you record your changes in settings after firing if you are moving them right after firing anyway? Is that just for future reference? Also, why does the windage change for different firing positions?
ocabj
Yes, recording after firing is simply for future reference. No-wind windage will change for different firing positions because I cant the rifle in standing and sitting.
Shawn
Great article! Thanks.
Darrin Montagna
Thank you for the article. It was very informative. One question. Where is you front sight set from fully bottomed. I do not have enough elevation in my rear sight for an across the course match unless my front sight is only one turn up. I have the A2 four position front post on a 20 in. bbl. I have a Rock River 1/4 x 1/4 NM rear sight. It only has 68 clicks from bottom to top. Any assistance would be helpful. Thanks, Darrin
ocabj
I have no clue where my front sight post is from fully bottomed. Your rear sight only has 68 clicks from bottom to top end? That’s kind of short. You should have at least 100 on it.
Anyway, you may have to readjust your 200 yard zero. Run your rear sight down to bottom. Then adjust your front sight to get you on at 200 (and then adjust the rear to get the final zero). This should maximize the range of adjustment on the rear sight to get you to 600.
If this still doesn’t work, you might have to change out the rear sight. It should work, though, and you’d still want to use the above method on any sight to maximize the elevation adjustment.
Darrin Montagna
I will check with Rock River maybe there is something wrong with the sight. Thanks for your response.
Darrin Montagna
I contacted Rock River Tech dept. We believe we figured it out. The tech at RRA thinks I was sent an incorrectly labeled detachable carry handle NM sight instead of the fixed handle sight. I am in the process of sending it back now. I will update this once I get the new one. The tech dept was very helpful & answered my emails & calls quickly. I wish customer service was as helpful everywhere else.
Darrin Montagna
I sent back the sight. It was package incorrectly. They sent me the correct one & now I have all the elevation I need. The tech at Rock River I dealt with was top notch. Thanks
Eugene J
Wish I could find just a match sight or dogleg that took different apertures, seems all are discontinued.